


🍕 Pizza Guide 🍕
World pizza day inspiration

Aussie style: With whisky BBQ sauce,
spike up your tomato pizza sauce.
Introduction
National dishes came from the military division and is defined as the
art to feed an entire army with the same meal at the same time.
Thus, came pizza, hot dogs, pirogues and roast pork with red cabbage
and brown sauce to the world.
#internationalpizzaday #nationalpizzaday #worldpizzaday
#PizzaPlanet #PizzaLAB #Pizzaria #Pizzatek #Pizzarium
LCARS Retrieval
National pizza day inspiration

Portuguese style: Porter beer 1:1 mixture, preferably a rich and thick tomato sauce.
Calendar
World Pizza Day Jan. 17 (Since 2017)
National Pizza Day Feb. 9 (Since 10th century)
Great American Pizza Bake (Feb 9th - Feb 15th)
National Pepperoni Pizza Day (Sep 20th)
The peak season for mushroom foraging runs from August through October, when cooler temperatures and autumn rains create ideal growing conditions. You can explore a detailed seasonal breakdown in the
Mushroom Forager's Calendar.
National Sausage Pizza Day (Oct 11th)
National Calzone Day (Nov 1st)
National calzone day inspiration

Calzone ingredients: Italian salami, Ricotta, Mozzarella, sliced ham and olive oil.
Pizzaware
Kitchenware for Homemade Pizza
-
Indoor / Outdoor pizza ovens
-
Pizza steel vs Pizza stone (A baking steel is better than a pizza stone for home pizza because it heats up 18x faster, creates crispier crust in half the time (4-6 minutes)
-
Pizza peels
-
Pizza dough docker (If you don't have one, use two forks instead)
-
BBQ grill gloves
-
Digital thermometer
-
Pizza rocker / Pizza cutter / Roller blade
-
Pizza plates
Pizza Dome
Dedicated Pizza Oven
Chefs would recommend a dedicated pizza dome and stone.
Chefs are mainly interested in how many pizzas they can sell over the least amount of time for high order volumes.
Chefs recommend preheating a dedicated pizza dome oven for 45-60 min.
Chefs bake them at 450-500°C/842-932°F for 60-90 secs. depending on the toppings.
Dedicated pizza dome ovens for home use come in a variety
-
Gas/charcoal for outdoor use reaching the highest temp
-
Taking your electrical fuse to the limit for indoor use
-
Multifuel burners
-
12"-inch standard size or 16"-inch for XL pizzas
-
Pizza oven to place on top of an existing grill (350°C/662°F)
A pizza stone can be made of materials such as ceramic, steel, cast iron, granite or cordierite, the stone acts as a kind of miniature version of the oven's scorching hot floor.
It retains heat much better than a regular baking sheet, and this means that the moisture in the pizza dough evaporates very quickly instead of being trapped in the dough.
The result: crispy bottom, shorter baking time.
Although a pizza stone seems like a sturdy thing, it requires a little care. Especially when it comes to temperature. The stone cannot withstand wild temperature changes – this can cause the dreaded thermal shock, where the stone cracks in the middle of your pizza party.
The trick is simple: always put your pizza stone in a cold oven. Place it at the bottom of the oven and let it heat up with the oven. This way you avoid it breaking because it goes from cold to blazing hot in a split second. The same rule applies when you use it. Do not put ice-cold dough or a frozen pizza directly on the stone – this can also cause it to crack.
Once the oven has reached the desired temperature, give the stone another 30 minutes to heat up. It should be piping hot before you put the pizza on. Use a pizza peel or a large cutting board to move the dough so you don't have to juggle your hands close to the blazing hot stone. Once the pizza hits the surface, the bottom bakes quickly, and in about 8-10 min. you'll have a crispy, golden pizza ready to serve.
Once you try a pizza baked on a stone, you won’t go back. In fact, the pizza stone can also be used for other types of bread, such as pita bread, bagels, or English muffins, all of which benefit from a crispy crust.
Fortunately, the pizza stone requires minimal maintenance. Because many of the stones are made of porous materials, avoid cleaning it with soap - it will absorb it and can give off an off-flavor the next time you bake. Instead, scrape off any leftover cheese, sauce, and dough with a spatula or scraper and wipe it down with a damp cloth. Make sure the stone is completely dry before using it again.
Bonus: you can leave the stone in the oven while you cook other food. It won't be damaged by the heat, and it even helps stabilize the oven temperature. Just be aware that the oven may take a little longer to heat up when the stone is in there.
Pizza Stone
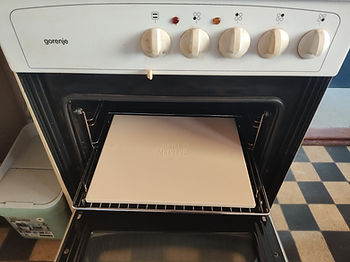
My pizza stone for a conventional oven can handle a 12-inch standard pizza, but my 12-inch pizza plates for serving
are bended at the edges, calling for only a 10-inch base, and they don't fit into my kitchen sink for cleaning, nor do they fit into my kitchen cabinet for storage.
A pizza stone can be made of materials such as ceramic, steel, cast iron, granite or cordierite, the stone acts as a kind of miniature version of the oven's scorching hot floor.
It retains heat much better than a regular baking sheet, and this means that the moisture in the pizza dough evaporates very quickly instead of being trapped in the dough. The result: crispy bottom, shorter baking time.
Although a pizza stone seems like a sturdy thing, it requires a little care. Especially when it comes to temperature. The stone cannot withstand wild temperature changes – this can cause the dreaded thermal shock, where the stone cracks in the middle of your pizza party.
The trick is simple: always put your pizza stone in a cold oven. Place it at the bottom of the oven and let it heat up with the oven. This way you avoid it breaking because it goes from cold to blazing hot in a split second. The same rule applies when you use it. Do not put ice-cold dough or a frozen pizza directly on the stone – this can also cause it to crack.
Once the oven has reached the desired temperature, give the stone 30-45 minutes to heat up. It should be piping hot before you put the pizza on. Use a pizza peel or a large cutting board to move the dough so you don't have to juggle your hands close to the blazing hot stone. Once the pizza hits the surface, the bottom bakes quickly, and in about 8-10 min. you'll have a crispy, golden pizza ready to serve.
Once you try a pizza baked on a stone, you won’t go back. In fact, the pizza stone can also be used for other types of bread, such as pita bread, bagels, or English muffins, all of which benefit from a crispy crust.
But a pizza stone requires maintenance. Because many of the stones are made of porous materials, avoid cleaning it with soap - it will absorb it and can give off an off-flavor the next time you bake. Instead, scrape off any leftover cheese, sauce, and dough with a spatula or scraper and wipe it down with a damp cloth. Make sure the stone is completely dry before using it again.
You can leave the stone in the oven while you cook other food. It won't be damaged by the heat, and it even helps stabilize the oven temperature. Just be aware that the oven may take a little longer to heat up when the stone is in there.
Cleaning
Cleaning can be done with a dedicated pizza stone brush,
just not with water, which can cause the stone to crack!
Step #1 Start with scrubbing the pizza stone with a dedicated smash burger spatula with beveled edges.
Place the other hand on the blade of the burger spatula. Place four fingers on top and your thumb on the underside for extra stability and a more effortless cleaning of the pizza stone. Hold the blade in an angle of 30-45°.
In some spots the burnt excess is more tough to cleanse. Tilt the blade towards the tip of one of the edges to scratch the surface.
Step #2 Once the rough cleaning is done, finish it off with coarse to medium sandpaper (P40 to P80-grit).
A sandpaper block made of cork is inexpensive and makes the job easier.
Squeezing the toppings with a pizza peel to make them stick to the dough might help to avoid extra cleaning of the oven and the pizza stone. It takes some skills to apply the pizza base onto the pizza stone with a pizza peel nice and clean. Focus! Hold the pizza peel in a 0° angle and shovel it back and forth a couple of times. Do not elevate the pizza peel, or the toppings might fall off and burn onto the rear plate of the oven!
How to clean the oven
(Danish)
No Pizza Stone
-
Turn on the oven to maximum heat – preferably with the grill on. It should stand and get absurdly hot.
-
Roll out your pizza dough – as usual, preferably quite thin, but with a little air at the edge.
-
Heat your, preferable cast iron, pan on the stove – high heat, no fat. It should be blazing hot.
-
Place the pizza dough directly on the dry pan – and let it bake for 1-2 mins. until the bottom starts to take on color.
-
Top the pizza while it's in the pan – quickly: tomato sauce, cheese, whatever you love.
-
Put the pan in the oven directly under the grill, 2-4 mins. Keep an eye on it! The cheese and edges should bubble.
Pizza Peels
First of all, a pizza stone also requires a pizza peel.
A pizza peel needs to be coated with flour so that the dough doesn't stick.
Too much flour makes the bottom get burned in spots.
My first mistake was to add one tablespoon of flour onto the table for the pizza base and another tablespoon for the steel pizza peel. One tablespoon for the pizza peel alone should do, so place the pizza base directly on top of the pizza peel while adding the toppings.
It just accumulates unnecessary amount of cleaning and altering the texture of the pizza base.
My first steel pizza peel is only large enough for a 10"-inch pizza. The handle is short, and gets very hot beyond +300°C/572°F. ⚠️
Other brands offer a handle that can be folded for better storage.
Pizza Peels △
-
Metal pizza peel
-
Wooden pizza peel
-
Bamboo pizza peel
Neither material is universally better; a wooden or bamboo pizza peel is best for launching raw dough, while a metal peel is best for retrieving and turning cooked pizzas.
Metal Pizza Peel
-
Entry level: Perfect for launching pre-baked supermarket pizzas into and out of the oven, as well as for using the metal peel as both a cutting and serving board.
-
Thin profile: Metal blades are very thin, allowing them to slide effortlessly under a hot, crispy crust to retrieve the pizza.
-
Sticky when raw: Raw dough grips tightly to cold metal if it sits too long, making a smooth launch tricky for beginners.
-
Turning control: Perforated metal peels work well for rotating pies inside blazing-hot ovens.
-
Easy cleaning: Aluminum or stainless steel won't absorb grease or stains and can be washed easily.
Wooden Pizza Peel
-
Great for launching: Wood is slightly porous, so it absorbs a tiny bit of moisture from the dough and prevents the pizza from sticking when paired with a little flour or semolina.
-
Prep friendly: You can build, stretch, and top your pizza right on the board.
-
Thicker edge: Wood is much thicker than metal, making it hard to slide under a partially baked or finished pie without pushing it around the oven.
-
Higher maintenance: Wood can warp, crack, or splinter if washed wrong and needs occasional oil conditioning.
-
Weight: Usually lighter and softer, making them very nimble to handle and flick when launching a pie.
-
Edge profile: Softer woods are easier to carve down into a very thin, tapered edge, which helps slide under dough smoothly.
-
Knife friendliness: Softer on dough but easily scarred and gouged by pizza wheels or knives, which can trap bacteria in the grooves.
-
Maintenance: More prone to warping or drying out if left wet or exposed to high heat for too long.
Bamboo Pizza Peel
-
Great for launching: Both bamboo and traditional hardwoods (like pine, maple, or poplar) excel at launching pizza into the oven because dough resists sticking to wood far better than it does to cold metal. However, they differ in durability, weight, thickness, and versatility.
-
Durability: Hard board and denser than soft woods; highly resistant to knife cuts, scratching, warping, and cracking.
-
Moisture resistance: Naturally absorbs less water and resists swelling or splitting over time.
-
Multi-use: Rigid and tough enough to double as a cutting and serving board for slicing pizzas right at the table.
-
Drawbacks: Typically, heavier than soft hardwoods and can sometimes be manufactured slightly thicker, making it harder to slide under a partially baked pie.
BBQ Grill Gloves

Conventional oven gloves made of 100% cotton are no good beyond +300℃/572°F with grill temperatures of 400-500℃/752-932°F ideal for pizza.
See the left glove index fingertip, it got burned, and I had to clean my pizza stone and oven for an hour extra because of the spill caused by getting my fingers burned. So, I did put the right glove into the left one, and it helped a bit, but not much.
Heat Resistant Silicone Non-Slip Long BBQ grill gloves certified for 800℃/1472℉.
BBQ grill gloves can withstand temperatures
800°C/1472°F for approx. 7-10 secs.
500°C/932°F for approx. 12-15 secs.
350°C/662°F for approx. 16-18 secs.
250°C/482°F for approx. 21-23 secs.
100°C/212°F for approx. 65-68 secs.
Digital Thermometer

With a fixed setting for measurements optimized for black surfaces.
Different Styles
International Cuisine
1. Neapolitan
Characteristics: This Neapolitan classic has a thin crust with airy, lightly charred edges. It's traditionally made with San Marzano tomatoes, buffalo mozzarella, and fresh basil.
How to make it: It requires an extremely hot oven (800–900°F/430–480°C), so invest in a pizza oven for authentic results. Top with simple ingredients that don't require long cooking times.
2. New York Style
Characteristics: A thin, pliable base with a slightly puffed edge. Perfect for eating on the go.
How to make it: Bake at 550°F/290°C in a regular oven. Use a simple tomato sauce and mozzarella, and finish with a sprinkle of dried oregano.
3. Sicilian
Characteristics: Square pizza with a thick, airy base and crispy edges. Perfect for large parties.
How to make it: The dough rises directly in a pan before baking. Par-bake the base to avoid a rubbery center and top with plenty of cheese and tomato sauce.
4. Detroit Deep Dish
Features: Thicker base with caramelized, crispy cheese edges. Sauce stripes are added after baking.
How to make it: Use a deep pan and a mixture of mozzarella and Wisconsin Brick Cheese. For the authentic flavor, bake over medium-high heat.
5. Chicago Deep Dish
The hallmark: Layers of cheese, meat, and chunky tomato sauce in a high, angular crust.
How to make it: Press the dough up the sides of a deep pan. Add the cheese first, followed by the filling, and finally the sauce. Bake for 30-40 minutes at a low temperature.
Another way to make a Chicago deep dish, is to start with putting slices of cheese all the way around the edges in a pie pan, so the cheese becomes caramelized.
6. Chicago Tavern Style
Characteristics: A thin, crispy base, cut into squares. Perfect as a bar snack.
How to make it: The dough is run through a dough machine several times to ensure an ultra-thin base. Use a sweet or spicy tomato sauce and slightly burnt mozzarella.
7. Californian
Characteristics: Focus on fresh and experimental toppings. Thin base with a slightly crispy bite.
How to make it: Bake at high heat and top with seasonal ingredients like burrata, squash blossoms or pickled vegetables.
8. Roman
Characteristics: Various styles – from thin and crispy Pizza Tonda Romana to thicker Pizza al Taglio, served in square slices.
How to make it: Use a high-hydration dough for a fluffy base. Toppings can be added both before and after baking.
9. Greek
Characteristics: Oily base with toppings like feta, tomatoes, and olives.
How to make it: Bake in a well-greased pan at 450°F/230°C. Be sure to use freshly grated cheese for a rich, flavorful topping.
10. Cracker Crust
Characteristics: Ultra-thin, crispy crust, often cut into squares.
How to make it: Use a low-hydration dough and bake directly on a hot pizza stone for extra crispiness. Perfect for light toppings like goat cheese and fresh herbs.
11. Roman Style
Dough made with semolina flour and a 70% hydration.
12. Lasagna Pizza
Easy 30 min. dough without yeast, but with baking powder/baking soda and Greek yogurt 10%. Toppings with a Mornay sauce.
13. Pizza Sandwiches
Inspired by an Italian street food called Panuozzo.
14. #CloudBread Pizza
A gluten-free, high-protein alternative to pizza crust.
Focaccia vs Pizza
Different Styles
Typically, pizza is served with oregano and/or basil if served with tomatoes.
Focaccia is typically served with rosemary, which is also good for a vegetarian pizza with ricotta or mascarpone and sliced potatoes.
The seasoning is typically added on top after baking. None of the ingredients are immune to the heat from the oven without losing its flavor. Same goes for the tomato sauce and the cheese.
Focaccia dough is typically given some time to rise after being flattened, while pizza dough is baked immediately.
In Italy, focaccia is eaten anywhere and anytime, for breakfast, lunch, dinner, as a snack or as a dessert topped with, for example, Nutella.
The dough for focaccia is often made with a high hydration (around 80%), and the most important ingredients are: Flour, yeast, salt, water and olive oil.
Compared to a regular bread dough, there is usually less handling with a focaccia dough and a longer rising time.
Focaccia is made in rectangular dishes (9x13" for 800-1000g) and is usually baked in the oven at 225-230°C/437-446°F for approx. 15 min.
The finished focaccia has a golden crispy crust, and a soft, airy crumb. A special characteristic of focaccia is the many small depressions on the top. They are made when you, with your fingertips, press the dough into the rectangular dish. However, the holes are not just for decoration – they also collect small “lakes” of oil, which cause the dough under the oil to bake less, thus giving the Italian specialty its slightly spongy consistency and good taste.

Thin Crust Tavern Style vs Deep-dish
Taverna in Italian
Detroit style pizza is a good place to start.
Dedicated pizza ovens for home use might have a tavern style program.
A standard pizza is 12" (same size as a Long Play record)
A pizza oven for home use should be able to contain a 12" pizza (30 cm).
Dedicated pizza plates for serving might not fit into your kitchen cabinet.
Taverns typically don't have plates, so they serve them square, not wedged, on napkins.
The most important thing is the amount of sauce. If you pour too much, you risk a soft and uneven dough. A good rule of thumb is that you should still be able to see the dough through the sauce. If you like your pizza extra juicy, you can always dip it in extra sauce after it's finished baking. A 12-inch pizza typically requires about half a cup of sauce, but exact amounts depend on preference and type of pizza.
Avoid that the tomato sauce gets too close to the edges, or it might get burned.
This is where the Detroit style introduces serving the pizza with a 'red top', meaning the tomato sauce is added on top after baking.
Then there's Chicago style. They can refer to both the well-known deep-dish or stuffed pizzas and the lesser-known thin-crust "tavern-style" pizzas.
For thin crust pizzas a pizza dough docker roller is typically used. If you don't have one, you can use two forks, one in each hand to do the job.
Deep Pan
Deep-pan pizzas offer the opportunity to add more tomato sauce, without the base getting soggy.
If you want 20-25% more ingredients on top, then consider a thick American deep pan base.

The first choice, is whether you want your pizza to be edible with your hands or with a fork and knife, or don't have plate dishware for a tavern style pizza served on napkins.
A pizza base should be edible with the bare hands after being sliced. If this is not the case, then I suggest not to use a steak fork on the far left in the picture, since the metal is soft and bends when sticking into a crisp base.
On the other hand, the steak knife to the far right is much better than its counterpart, because of its saw-toothed shape like a bread knife.

Tavern Cut ☐ vs Traditionally Sliced △

Calzone vs UFO Pizza
Pizza Pockets
Calzone

Pros
-
Solves the problem with a metal pizza peel being insufficient over a wooden peel
-
Far less efforts with having to clean the pizza stone
-
Preserves the flavors over open-faced pizza
Cons
-
Might become slightly undercooked if bacteria/germs are an issue
-
The edges might get burned, but you won't probably eat that with an open-faced pizza either.
Notes
-
The herbs on top are just for decorating, but will lose their flavors when exposed to heat
-
Do not omit to brush the top with any tomato paste mix or it will get burned
-
Whilst an open-faced pizza sports a tomato base and mozzarella, as the base
a calzone hosts the mozzarella inside, but the tomato base on the outside!
Contradictions
Pros: Perfect for home ordering, the content will still be hot.
Cons: The contents may not have been cooked/baked enough to cause diarrhea, laxative effects, stomach problems, etc.
Alternatives
Stromboli (Pizza Rolls)
Pizza Fritta (Deep-fryed)
Ingredients
Italian Salami Types
Subissati Salami Diavola
If you want to spice up your pizza, you should try Subissati Salami Diavola – A strong, spicy salami that is made for the Italian national dish.
The spicy salami is made from 100% Italian pork, which is flavored with chili to give the sausage its characteristic spicy flavor.
The delicate salami comes from the family business Subissati, which has been located in the hilly Italian countryside near Roccastrada since 1963.
It is also said that part of the good taste in the delicious salami comes from the area's special climate – whether this is where the secret behind the unique flavor lies, we cannot say – all we know is that it tastes damn good on a pizza.
Subissati Salami Morellino
A truly delicious salami produced from the best pork from Italy – but it is the combination of the exquisite meat and the delicious Morellino di Scansano DOCG red wine that gives the salami its bright ruby red color and its unique flavor.
Subissati Salami Morellino is the perfect combination of the flavors from the special climate in the hilly landscape of Roccastrada – and the flavorful red wine, which received its DOCG certification in 2006, and was thus recognized as one of Italy's best wines.
Subissati Salami Tartufo
If you are a fan of the unique taste of the sought-after tuber-shaped mushrooms (truffles), you should try this truffle salami. It is produced from 100% Italian pork and has a perfectly balanced truffle flavor.
The family business Subissati is behind the tasty Subissati Salami Tartufo. Since 1963, the passionate people at Subissati have been recognized for an uncompromising approach to their raw materials and have always had great respect for artisanal traditions, and you can taste it.
Procedure
Place the toppings 2/3 towards the edge, before closing it, not in the middle.
Layer#0 Bottom pizza dough
Layer#1 Ricotta
Layer#2 Sliced ham
Layer#3 Mozzarella
Layer#4 Spiced salami
Layer#5 Close the remaining dough on top
Layer#6 Rich flavored tomato passata on top
Layer#7 Grated Pecorino on top on the tomato passata
How to Eat a Calzone
To eat a calzone properly, let it rest for 3 to 5 minutes so the molten cheese sets. Cut it in half or use a diamond grid pattern with a knife and fork for the hot middle, then dip bite-sized pieces into marinara sauce. You can pick up the cooler end crust by hand.
Step-by-Step Eating Guide
-
Rest: Let the calzone sit for a few minutes so the steam escapes and the ricotta-mozzarella filling tightens up.
-
Slice: Use a knife and fork to cut the calzone down the middle or into smaller sections.
-
Cut and Dip: Cut individual bite-sized pieces from the center. Dip each piece into a side of warm marinara or pizza sauce rather than pouring sauce on top.
-
Hand-held finish: Transition to using your hands for the drier, cooler ends or the outer crust once you finish the heavy middle.
🛸 UFO PIZZA 🛸
Typically, with a spaghetti bolognese filling.
How about Area 51 for a naming convention?
Prick holes with a fork in the top half of the dough to allow steam to escape during baking for both a calzone and a UFO Pizza.
The difference between calzone and UFO Pizza is that a calzone is made of one bottom folded on the middle. A UFO Pizza is made of two bottoms.
For both a thin border and a slightly thicker center is recommended.
For a calzone completely backwards starting with adding the Ricotta Fior de Latte, and at last the tomato sauce on top after it's closed.
For a UFO pizza or calzone either way make sure the tomato sauce only goes 1½" near the edges, so the dough will close properly. Some use a fork to squeeze the edges together.
Some would say you cook the spaghetti as usual, but how about a la dente with a couple less of minutes in boiling water, to compensate for a couple more minutes in the oven?
Most recipes I've found uses leftover spaghetti or will not tell how to cook it.
Cook noodles to al dente, drain!
Some would put to tooth sticks on top to make look like UFO antennas.
Viking Pizza
Different Styles

There can be only one, so it has to be Danish! The Swedes and Norwegians can't stand strong flavors and smells, especially when it comes to the cheese.
So far, I have only seen two pizza recipes called Viking pizza. One is with tuna and shrimp. The other is with tuna and corn, which after all makes good sense in the buddy system.
But fish and pizza are as controversial as Hawaiian pizza with pineapple, although pretty common in Asia, but not something I associate with Scandinavia.
Denmark is a coastal nation, but we eat pigs and export our fish. Immigrants who come to Denmark to open a Pizzaria, got the wrong impression of what it means to be a Viking.
Vikings drinks strong beer and eat red fly agaric just to get a kick out it.

Mixture Ratio 1:1:1:3
Pepperoni pork and onion ring of same size
with one slice of jalapeño and three slices of pickled paprika in a mixture ratio of 1:1:1:3.
Crisp and strong in flavor. Smells fantastic in the heated oven.
The amount of jalapeño won't overtone the taste of the other ingredients.
You could also try a classic jalapeño popper, also called jalapeño pops or jalapeño bites, that starts with a hollowed out whole jalapeno that some would stuff with cream cheese, cheddar cheese and sometimes bacon, similar to how stuffed bell peppers are made.
But the main thing is, that removing the inner watery part of pickled jalapeños that have already been sliced helps to avoid that the pizza base gets soggy.
Alternatively, you could try Padrón pepper, also called Herbón pepper, from the municipality of Padrón in northwestern Spain.
Padrón is considered a mild chili, as it is usually harvested at an early stage, when it is the size of a mouthful. However, it is still unpredictable: among the many mild chilies, you will most often come across one or more chilies that turn out to be quite hot.
Red bell peppers are easily hollowed out, while smaller pebers like jalapeño and padrón pepper instead can be sliced across into two half boats.
Generally, when adding chili or jalapeño you can remove the seeds inside, so they won't be too hot.

Any cone-shaped object can pop the Jalapeños regardless of the size.
Pizza Diavola
(derived from diavolo)
An Italian recipe with Mozzarella, pickled red peppers, Spanish Chorizo, Italian Provolone and Jalapeños.

Pepperoncini vs Jalapeños
When Italian tourists visit a foreign country and order a pizza with pepperoni, they believe to have ordered a vegetarian pizza.
The confusion begins with how it is spelled, pepperoni vs peperoni (bell peppers).
Scoville Heat Units
Chili spiciness is measured in Scoville Heat Units (SHU).
Jalapeño - Medium (2,500 to 8,000 SHU)
Pepperoncini Peppers - Very Mild (100 to 500 SHU) | Sold as "Pepperoni" in Danish (confusion)
Pyruvate Scale vs Scoville Scale
The pungency (spiciness/sharpness) of onions and garlic are measured on the Pyruvate Scale from 1-10.
The lower the number, the sweeter and milder the vegetable.
Yellow Onions vs Brown Onions
Standard yellow and brown onions typically rank between 6 and 7 on the 10-point scale. This places them in the "medium to strong" pungency category. Yellow onions and brown onions are the exact same thing. They are the most common "all-purpose" cooking onions globally. The name used simply depends on the region - referred to as "yellow onions" in the US and "brown onions" in countries like the UK and Australia.
However, because the pyruvate scale is a direct measure of an onion's chemistry, yellow onions can span a wide range depending on their variety and growing conditions:
-
Standard Yellow Onions (Scores 6–7): Moderate to high pungency. Best for cooking, as the heat mellows out the sharp sulfur compounds.
-
Sweet Yellow Onions (Scores 2–3): Varieties like Vidalias, Walla Wallas, or Oso Sweets. They score below 5 on the scale, making them ideal for raw applications like salads or sandwiches.
Pizza Flour
Types of Flour for Different Styles
-If you can get the pizza base crisp and crunchy, then you've accomplished 80% right!
Gluten wheat flour has a grinding degree of 78-80%
Durum flour has a milling degree of 75% and a high content of gluten.
Pizza flour has a grinding degree Tipo 0: 65% | Tipo 00: 55% (higher content of shell parts).
Pizza flour comes in 3 varieties, one for long-term rising, one for cold rising.
When using real pizza flour, the edge of the pizza should rise more.
Some also mix semolina flour with the pizza flour.
See also Pinsa bread, also known as pinsa romana, an oval-shaped flatbread, healthier alternative to pizza.
Pinsa bread is made from a special blend of wheat flour, rice flour, and soy flour (or sometimes spelt), mixed with high amounts of cold water, sourdough, salt, and a little olive oil.
Semolina Flour
(Also known as semola or semulje)
Semolina flour is made from finely ground wheat grains dürüm wheat. Unlike most flours used for pizza, semolina is harder than other types of wheat.
Dürüm wheat has a higher protein content (gluten) than traditional wheat. Semolina has a relatively strong flour, with W-values that are typically in the range of 200-250. Semolina is known for its light-yellow color, which the flour gets from dürüm wheat, and is often used for bread and pasta.
For pizzas, it is advantageous to mix a little semolina flour into your pizza flour. This way it benefits from the relatively high-protein content from the dürüm wheat.
Some also use semolina when “opening” a pizza dough, as the relatively coarse grains in semolina make it easier to make the dough slide on the table, between the hands and on the pizza peel.
Dürüm vs Semolina Flour
A dürüm (Turkish pronunciation: [dyˈɾym], "roll") or dürme is a wrap that is usually filled with döner kebab ingredients.
Durum flour is a by-product of semolina production. It can absorb more water and might come in handy when experimenting with higher hydration levels of the dough.
200g Durum (rustic) flour. Add everything and stir until the lumps are dissolved. Feel free to try a little more Durum and less gluten the next time, but not just 350g Durum, without wheat flour.
With only 100% Durum alone, the texture becomes cloudy and coarse.
150g gluten (protein-rich, rises well) wheat flour (add a little at a time).
Manitoba Flour
Manitoba flour is also used for pizza, especially for doughs that require high hydration levels or long fermentation (rising for 24-48 hours).
Why Use Manitoba Flour for Pizza
-
High Protein: Manitoba flour is a wheat flour, high in gluten proteins, 13% or higher. Giving the dough high elasticity and resistance.
-
Puffy, Airy Crust: It traps gas efficiently during fermentation, making it ideal for the puffy, honeycombed edges found in Neapolitan or Roman style pan pizzas.
-
Better Digestion: Because it handles long cold-fermentation times well, the resulting pizza crust is light and easy to digest.
How to Use It
-
Blending is Best: Pizza chefs do not use 100% Manitoba flour because it can make the crust too chewy or tough. Instead, they blend 10-30% Manitoba flour with standard Tipo "00" pizza flour, or with all-purpose flour, which also has a high gluten content.
-
When to use 100%: You can use it solo for high-hydration styles like pizza alla pala (Roman-style paddle pizza) or thick pan pizzas, but it requires adjusting your water levels higher (70%+ hydration).
-For a thin crust pizza chefs recommend all-purpose wheat flour, for a higher gluten content to rise the dough!

Dedicated pizza flour makes the dough very elastic and springy (Tipo: 00 | Tipo: 0)
Different styles of pizza call for different type of flours, from all-purpose bread flour to semolina flour.
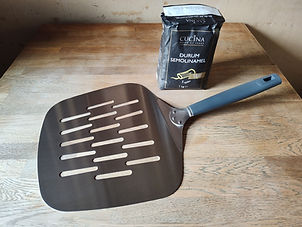
Pizza peel with semolina flour.
Not too little or the pizza base will stick.
And not too much or the excess flour will alternate the texture and overtone the taste of the both the pizza base and the toppings.
Fermentation
Autolysis and Types of Yeast
Triple fermentation
Triple-fermented pizza dough is a high-level, slow-rise technique that enhances flavor, digestibility, and texture by subjecting the dough to three distinct resting phases, usually involving a mix of room-temperature and long-term cold fermentation (often 48–72 hours total). This method creates a highly extensible dough with a complex, slightly tangy flavor and a light, airy crust.
Sugar
Sugar is generally not used for a pizza dough. Sugar acts as a binding agent for liquid, so that bread
does not dry out so quickly. But sugar also speeds up of the fermentation process.
Some use a pinch of caster sugar (superfine sugar) not just for flavor, to further increase the yeast's activity and tenderise the dough.
Salt/Iodine
In the pro-western oriented countries, we consume four times as much salt of the recommended daily dosis.
Sodium slower the heart rate and causes cardiac arrests.
Nevertheless, you need sodium for your survival, especially for outdoor cooking.
In the pro-eastern oriented countries, they do the same with soy/soya, also called the Asian salt.
Salt has a preservative effect, especially for fresh fish. At first, I thought rubbing salt into your open whiplash on board a ship for mutiny and the like was to make the pain worse, but it was out of pity for the open wounds to become infected. Iodine later became a painless disinfectant.
Chefs prefer Kosher salt because it does not contain iodine, which has a metallic aftertaste. However, the authorities added iodine to the salt to prevent common diseases caused by a lack of iodine in the daily recommended amount, which costs society a fortune.
Beetroot contains a small amount of iodine, about 0.5 micrograms per 100 grams. It is not a significant source of iodine compared to other foods known for their iodine content, such as seawater, seafood, and iodized salt. I remember eating my beetroots and never getting the supposed common illnesses caused by iodine deficiency.
Salt is generally used to prevent fungal infections in bread. Hence, salt should also not be necessary
for a pizza dough, as long as it rises for a long time in the refrigerator.
But salt also slows down the fermentation process.
Never add salt directly to the yeast, as the dough will not rise properly, due to the autolyse process.
Autolysis
Biochemistry, to undergo or cause to undergo autolysis.
Measure the temperature of the water (20°C/68°F)
Pour water and yeast into a bowl and stir until the yeast is dissolved.
Pour the flour into the bowl and stir it into the water – it should only be just mixed together, do not stir or knead a lot.
Let it stand for 45-60 min. and autolyse.
First now add the salt.
Yeast
20 g yeast of fresh yeast for short-term fermentation in the fridge.
Only 5-10 g yeast for long-term fermentation in the fridge.
Some pizza chefs say that organic yeast provides the best result.
But taste tests and baking results show no noticeable difference in the final crust flavor, rise, or oven spring between organic fresh yeast and conventional fresh yeast.
Both are used the same way, typically crumbled and dissolved directly into your water before mixing in flour, and follow the same conversion rates if substituting for dry yeast (using about 3 times the weight of dry yeast).
Dried yeast is easier to source than fresh yeast, dried yeast is a powerful ingredient that creates carbon dioxide when it feeds on sugars in the dough. This makes pockets of air in your pizza dough resulting in an airier, fluffier crust.
0.2 oz / 5-6g Fresh yeast
0.1 oz / 2-3g Dried yeast
-Some might even recommend only 1/5 and not 1/2 if dried yeast is used!
Dissolve the yeast in lukewarm water or pasta water first. Lukewarm water stimulates the fermentation process.
Do not omit the oil, it makes the dough pliable. Mix the above and leave the bowl on the radiator for 5 min. until the yeast has dissolved.
2 hours rising time on the table at room temperature to double the size (not just 20 min.)
6 hours of long-term fermentation is not enough to take out the flavor of the yeast.
6-48 hours long-term fermentation in the refrigerator (takes the flavor of the yeast over time, the longer the time, the less yeast is needed).
Pizza Dough
Hydration Levels
Before moving on to the next level to make your own pizza dough from scratch, I recommend making the first 30 pizzas with premade dough from the supermarkets to gain some routine and experience.
If you don't have time to experiment with both making a pizza dough, toppings and baking time all at once, then a premade pizza dough from the supermarkets will do.
The excess dough can be used as a padding in spots where the dough might become thin by stretching.
Hydration levels
1. Neapolitan 60% hydration
2. Roman style 70% hydration
3. Focaccia 80% hydration
Some would say that for an authentic Neapolitan pizza dough, there goes a pinch of honey into it.
A few tablespoons of Greek yogurt in the dough adds both fat and acid, which helps gluten development and makes the dough more elastic and pliable – and when baked, you get a crust that is crispy on the outside and slightly chewy and airy on the inside. The dough becomes relaxed, supple and rises big and beautiful in the oven.
Recipe from a flour bag
2 Portions
250 g pizza flour
1 tsp. sugar (ca. 5 gram)
3/4 - 1 tsp. table salt
1.5 - 2 dl lukewarm water
12.5 g yeast
2 tbsp. virgin olive oil (1/4 dl)
The excess dough after rolling out can be used to make a high border with the spring form for a lot of beef.
Do NOT use a spring form for baking pizzas, the spring form will deform as high temp. are the key to succes.
The best pizza needs to start with the best dough. That means you shouldn't use any old flour.
Do not over-kneading the dough. You don't need to knead for more than 2-3 min.
Let the dough come to room temperature for at least an hour since the warm-up will help it become more pliable for stretching. Then stretch the dough by hand, giving it great texture instead of rolling the dough, which removes the air.
1 tbsp. olive oil to grease the bowl with. Wash the bowl first and turn the dough in the olive oil.
Halve the dough into two equal portions for an 8-inch springform pan.
Spray the springform pan first with olive oil.
Rolling Pin
Generally, the usage of a rolling pin is banned for making pizza doughs.
It takes out the air of the pizza base, which the fermentation process was all about.
1 tbsp. extra of preferably coarse-grained semolina flour on the table to make it less sticky.
Stretch the dough with your hands. Squeeze the center of the pizza base with your fingers to make it thinner than on the edges, that needs to be fluffy and airy.
The dough though can be rolled up around a rolling pin for easy application in a springform pan if used for baking in a conventional oven not above 220°C/428°F.
🥫Passata/Pesto 🥫
The Bottom Adhesive
Introduction
-Pizza experts and chefs frequently describe tomato sauce as the glue that holds the whole pizza together!
Why It Acts as Glue
-
Moisture and Adhesion: The sauce creates a sticky, tacky layer on top of the raw dough. This layer helps loose ingredients like grated cheese, herbs, and small meat pieces stick in place before and during baking.
-
The Bridge Effect: It acts as a mechanical and flavor bridge between the dry bread crust and the heavier toppings above it.
-
Viscosity: A well-reduced pizza sauce has enough thickness (viscosity) to grip the dough without sliding off, anchoring the lower layer of toppings.
The Real Heavy-Duty Glue
While tomato sauce provides the initial sticky foundation on the dough, melted cheese is actually the primary structural adhesive that locks all the upper toppings into a cohesive layer once baked.
When toppings slide right off a slice, it is usually because a "slip layer" of moisture or oil has formed between the crust and the cheese.
To fix this and lock your toppings firmly in place, use these expert techniques for adjusting your sauce and perfecting your layering order:
1. Fix the Sauce Thickness & Quantity
-
The "Spoon Test": Before putting sauce on your dough, test its thickness on the back of a spoon. It should cleanly coat the back of the spoon without running off immediately. If it drips like water, it is too thin.
-
How to Thicken It: Never use cornstarch or artificial thickeners (which can turn the sauce gummy). Instead, simmer your sauce on low heat to reduce the water content, or stir in a small amount of high-quality tomato paste to increase the tomato solids naturally.
-
Less is More: A common mistake is using too much sauce. Use a light hand - you should still be able to see the dough peeking through the sauce in some areas before adding cheese.
-
Watch the Oil: Avoid brushing a heavy layer of olive oil directly onto the raw dough skin before saucing. This creates a literal slip layer that causes the sauce and cheese to slide off together in one piece.
2. Perfect the Layering Order
-
The Dough Border: Leave a 1/2-inch to 1-inch border of bare dough around the edge.
-
Anchor the Edge: When spreading your cheese, make sure it covers the outer edge of the sauce and overlaps slightly onto that bare dough border. When it bakes, the melted cheese fuses directly to the crust, anchoring the entire cheese blanket so it cannot slide forward when you take a bite.
-
The "Over vs Under" Strategy
-
Under the Cheese: Place high-moisture ingredients (like fresh tomato slices or mushrooms) or small, loose items partially under the cheese layer. The cheese acts as a net holding them down.
-
Over the Cheese: Flat meats like pepperoni go on top of the cheese so they can crisp up and release their oils into the air rather than trapping steam underneath.
-
-
Ditch the Water: Raw vegetables like mushrooms, onions, and bell peppers release a ton of water as they cook. This water pools on top of the sauce, creating a slick puddle. Pre-cook or sauté these veggies beforehand to sweat out the moisture before adding them to the pie.
-
Cut Toppings Smaller: Huge, heavy chunks of meat or vegetables naturally pull away from the slice under their own weight. Dice or slice your toppings finely so they nestle securely into the melted cheese.
Passata vs Tomato Sauce
Passata can be too thin for pizza sauce if used straight from the bottle or jar, as excess moisture will make the pizza base soggy.
Why Passata Can Be Too Thin
-
High Water Content: Passata is a strained, uncooked tomato puree that often retains a liquid consistency.
-
Soggy Crust Risk: Putting watery sauce directly onto raw dough prevents the center from baking properly, leaving it soggy and undercooked.
-
Brand Variation: Some commercial passatas are thick and viscous, while others are quite watery.
How to Fix Passata for Pizza
-
Simmer it Down: Pour the passata into a saucepan with a little olive oil, salt, and herbs, then simmer it gently on low heat until it thickens to your liking.
-
Add Tomato Paste: Stir in a small spoonful of tomato paste to quickly body up the sauce without needing a long cooking time.
-
Strain It: Let the passata sit in a fine-mesh sieve for 10–15 minutes to drip away extra watery liquid before seasoning.
Entry Level
Pizza Marinara vs Pizza Margherita
Pizza Marinara and Pizza Margherita are the two classic, foundational Neapolitan pizzas, with the key difference being that Marinara is a cheeseless "pizza rossa" (tomato, garlic, oregano, olive oil) focused on pure, acidic flavor, while Margherita features mozzarella, basil, and tomato for a creamy, balanced, and more modern taste.
Traditional Marinara/Margherita are made with San Marzano tomatoes.
The better the pizza base, the less there is a need to smother the pizza with toppings.
A deep-frozen pizza, deep pan or not, doesn't get any better by adding extra toppings either.
When it comes to pizza, less is more.
Tomato Base vs Sliced Tomatoes
Like with burgers it is either / or with tomatoes, ketchup or passata
Cherry tomatoes are expensive but have a low-water content.
Sun-dried tomatoes also have a low-water content, but a high level of oil-content.
Avoid toppings with a high-water content like ordinary tomatoes or pineapple, or the base does not become crispy, but soggy.
If you plan on adding any kind of tomato as topping, I suggest squeezing them with your hands over a sink to reduce the watery part.
2½ tbsp. pizza sauce spread evenly over the pizza base.
You should be able to see the dough under the tomato passata to avoid the base gets soggy.
It has become widely popular to add a bit of fish sauce for a rich flavored tomato sauce.
Some mix both a tomato paste with tomato sauce. Also, for a spaghetti bolognese.
And also, a bit of sugar to take the acidic taste of the tomato paste.
Others would also add a teaspoon of sugar to compensate for the tomato paste being acidic.
1 large, sliced tomato with olive oil and basil (avoid the oil if homemade spice oil is also used). Oregano/Basil (avoid too much especially if it is completely fresh). Smells very intense at the beginning of baking, while others add tomato and basil raw at the end after baking, to emphasize the scent of basil.
For a creamy tomato sauce, you could add pasta-water, just like the Italians do.
If you choose to use tabasco for your tomato sauce, I suggest you go easy on the eventual jalapeños as toppings also.
You could also add 1-2 tbsp. of Gochujang sauce to the tomato sauce for a Korean style pizza.
Homemade Tomato Sauce
-A homemade pizza sauce is appreciated by chefs!
-
400 g of canned peeled tomatoes (not pre-chopped, or thin tomato soup, nor the cans sold as tomato sauce)
-
1 tsp salt
-
1 tsp freshly grounded black pepper
-
Fresh or dried basil (Italian pizza chefs prefer fresh basil)
Use a potato masher to mash the peeled tomatoes. If you want to use a stick blender, then do it gently, so the consistency doesn't get too thin, but still remains pulpy. Do not reduce the tomato sauce with heat, since it will also lose its flavor when baked in the oven.
For a pasta dish, it is common though to reduce on the tomato sauce.
-See the Detroit / Chicago styles for adding the tomato sauce on top!
The tomato sauce is best stored at room temperature for 1 day. After that for up to 4-5 days in the fridge.
Alternative Sauce
1. Pesto
Pesto is a traditional Italian sauce that originated in Genoa, located in the Ligurian region of Northern Italy. The most famous, classic version is pesto alla genovese (green pesto), typically made by pounding fresh basil, garlic, pine nuts, coarse salt, extra virgin olive oil, and cheeses like Parmigiano-Reggiano or Pecorino Sardo.
Pesto is a versatile, uncooked Italian sauce (traditionally basil, garlic, pine nuts, olive oil, and cheese) used to add fresh, vibrant flavor to dishes. It's best used as a finishing sauce or spread on pasta, gnocchi, sandwiches, pizzas, roasted vegetables, grilled meats/fish, salads, and as a dip.
Parsley pesto is a vibrant, budget-friendly alternative to basil pesto, blending fresh flat-leaf parsley with garlic, olive oil, nuts (walnuts or pine nuts), parmesan, and lemon juice. This versatile sauce is perfect for pasta, veggies, or spreading on toast. It is best made by blending ingredients in a food processor until smooth or to desired consistency, then storing with a layer of oil to prevent browning.
Basil or parsley, or both combined for that sake, remember chefs are not fond of the stems, edible or not.
Traditional Genovese pesto does not contain anchovies; it is made of basil, pine nuts, garlic, parmesan, olive oil, and pecorino. However, anchovies are a common addition in certain regional variations, particularly Sicilian or coastal Italian, where they are added for extra depth, saltiness, and savory umami flavor.
Food processor vs Mortar and pestle
If processed for too long with a mortar and pestle, the basil/parsley will start to oxidize (browning, alternating the taste).
Food processor, coarser but more homogeneous. Chefs go crazy if there's chunks of garlic in it.
Mortar and pestle, a smoother puree, but requires more efforts.
Pounding with a pestle instead of grinding in a mortar is best.
A green pesto can be used instead of a tomato passata for either the pizza base before baking, or as a topping after baking for a fresher taste.
Fresh, green and full of flavor, pesto gives your pizza an herbaceous edge that pairs perfectly with mozzarella, sun-dried tomatoes and artichokes. I recommend using pesto as a topping after baking. Replacing a classic tomato passata with a premade green pesto, suits well right out of the oven, but as soon as the pizza turns cold, the oily pesto will turn your pizza base into getting soggy.
Red Pesto vs Green Pesto
Red pesto (pesto rosso) and green pesto (pesto alla genovese) differ primarily in their base ingredients, color, and flavor profiles.
Green pesto uses basil, pine nuts, and Parmesan for a fresh, herbaceous, and nutty taste. Red pesto is made with sun-dried tomatoes or red peppers, often using almonds, resulting in a sweeter, more intense, and tangy flavor.
The key to a perfect pesto is a balance between the ingredients. The right amount of salt and garlic, etc. and the right consistency.
Pistachio Pesto
Pistachio pesto (pesto al pistacchio) is a creamy, rich Sicilian condiment made primarily from blended pistachios, olive oil, parmesan cheese, and garlic. Unlike basil-based pesto, this nutty, slightly sweet variant often omits basil or uses it sparingly, offering a unique flavor profile often used on pasta, bruschetta, or alongside seafood.
2. Alfredo Sauce
Rich, creamy and packed with cheese. Perfect for seafood pizza.
Alfredo sauce is a rich white pasta sauce primarily made from butter, heavy cream, and freshly grated Parmesan cheese. Common additions for enhanced flavor include minced garlic, salt, black or white pepper, and sometimes a pinch of nutmeg or Italian seasoning. Using high-quality ingredients, particularly fresh Parmesan rather than pre-grated, ensures a smooth, non-grainy sauce.
3. Garlic and olive oil
Simple and elegant. Often used on “white pizzas” – and works great with four cheeses and crispy vegetables.
4. Buffalo Sauce
Spicy, tangy and buttery. Try it with chicken, jalapeños and a little ranch dressing on top.
5. Barbecue
Sweet, smoky, and a hit with pulled pork or chicken. Bonus points for caramelized onions and hot honey.
6. Romesco
The Spanish darling made with roasted peppers, almonds and garlic. Smoky, nutty and perfect with ricotta and artichoke.
7. Arrabbiata
An angry version of tomato sauce – with chili. For those who want warmth under their feet and fire in their palate.
8. Chimichurri
Parsley, oregano, garlic and vinegar in a fresh, green bomb. Works surprisingly well with steak and grilled vegetables.
9. Béchamel
The French mother sauce gives you a creamy, neutral base that lets toppings like bacon, mussels, and cheese shine through.
10. Salsa Verde (with tomatillos)
A Mexican darling that brings acidity and freshness to your pie. Use with Cotija, corn, and chorizo.
11. Mexican Enchilada Sauce
For a rich flavored tomato passata you could also try either a red or green Mexican Enchilada Sauce.
12. Curry Sauce
If you make curry, make some extra and throw it on your pizza. Use naan as a base, and top with chicken, potatoes and coriander.
13. Harissa
North African spice paste with chili and cumin. It tastes great with olives, lamb and red onion.
14. Olive Tapenade
Olive puree may not be for everyone – but if you love salt, umami and a little edge, try it with feta and sun-dried tomatoes.
15. Hummus
Chickpea cream can do more than just dip. Use it as a base with spinach, red onion, and lots of cheese. Bonus: it's filling and high in protein.
16. Apple Butter
Sweet and spicy apple puree. Yes, it works on pizza – especially with cheddar, bacon and a little arugula. Think: charcuterie on a crust.
17. Peanut Sauce
Thai vibes on pizza. Peanut, soy and ginger provide an umami-rich base for chicken, onions and fresh vegetables.
18. Nutella
For a dessert pizza, bake the base first, spread Nutella on it, and top with strawberries, banana or Ferrero Rocher.
Pizza Toppings
The Filling in between the Bottom and Top Adhesive
National Sausage Pizza Day (October 11)
-
What it celebrates: A tribute to one of the most popular pizza toppings in the United States.
-
Key ingredients: Pizzeria styles feature pork, beef, or chicken sausage (often classic Italian sausage spiced with fennel and garlic, or smoky variants like chorizo).
-
How to celebrate: Order a slice or whole pie from a local pizzeria, build a homemade pizza, or explore regional crust styles (such as thin-crust or deep-dish).
Top 10 Pizza Toppings
(US and Canada)
-
Pepperoni: The undisputed champion, offering a salty, smoky, and slightly spicy flavor.
-
Sausage: A savory, popular choice often paired with peppers or onions.
-
Mushrooms: The top vegetable choice, providing a robust, earthy flavor and great texture.
-
Bacon: Loved for its crunchy, salty, and savory addition to any pizza.
-
Extra Cheese: Enhances the gooey, melty base of mozzarella.
-
Onions: Add a sweet and savory element, particularly popular in red-sauce pizzas.
-
Green Peppers: Offer a crunchy, slightly sweet-and-sharp contrast.
-
Black Olives: Provide a firm texture and a briny, salty flavor.
-
Pineapple: The core of the "Hawaiian" pizza, bringing a controversial yet popular sweet and tangy contrast.
-
Ham: A mild, salty meat often paired with pineapple.
In Denmark Döner Kebab takes the 2nd place right next after Pepperoni.
Popular Combinations & Variations
-
Supreme: Generally, includes pepperoni, sausage, mushrooms, onions, and green peppers.
-
BBQ Meat lovers: BBQ sauce base with bacon, ham, sausage, and pepperoni.
-
White Pizza: Often features ricotta, garlic, and herbs without tomato sauce.
-
Gourmet Options: Trending toppings include hot honey, salami, prosciutto, and feta.
-
The Ultimate Texas, meaning more meat as toppings: Kebab, ham, bacon, sausages, and pepperoni.
-Check if your local Pizzaria is Halal-certified amongst other certifications!
I've been wondering for a long time about in what order to place the toppings after the passata and the cheese for a basic Margherita. The confusion begins with Chicago/Detroit style adding the passata on top after baking the pizza base. So far, I have lately discovered more styles putting the pepperoni/kebab/ham/sausage directly on top of the pizza base before any other toppings by the culinary buddy pair system.
Sometimes less is more. That's where the buddy system comes in handy.
Especially for a perfect crisp pizza base, investigating the buddy system becomes mandatory.
Apparently, no professional is fully capable of the buddy system.
I am currently looking into different combo styles.
"Pepperoni buddy system" likely refers to "Buddy's Pizza", a restaurant known for its Detroit-style pizza, and in particular their pepperoni pizza. Buddy's Pizza places pepperoni directly on the dough before it rises, allowing the dough to absorb the savory oils from the meat.
Toasted ham and cheese sandwich is absolutely fantastic and simple at the same time.
Tuna, corn and red bell pepper is also a common combo.
Mushrooms 🍄 and bacon 🥓complement their flavor well, just like with burgers.
6 slices of bacon strips for an 8"-inch spring form pan. Taste is retained under high heat.
🥓 Bacon and Brie cheese 🧀 also complement their flavor well, but Brie cheese is not recommended for pizzas.
🧀Brie vs. Camembert cheese 🧀 with a tsp. of blackcurrant marmelade on top is a Danish cuisine for bread rolls or a slice of bread but has nothing to do with pizza.
For more information see the buddy system.
🍄 Mushrooms 🍄
Button mushrooms vs Cup mushrooms
Sliced mushroom. Dry on kitchen paper first, otherwise the pizza bottom will be soggy with the wet filling.
The most common mushroom on pizza is the white button mushroom, prized for its mild flavor and affordability. Cremini (baby Bella) and portobello mushrooms are also very common, favored for their deeper, savory flavor and firmer texture. While fresh is preferred for a better texture, canned button mushrooms are also frequently used on commercial pizzas.
Most Common Pizza Mushrooms
-
White Button Mushrooms: The standard, go-to choice for most pizzerias.
-
Cremini / Baby Bella Mushrooms: Younger versions of portobellos, these offer a more intense, earthy flavor than white buttons while remaining firm.
-
Portobello Mushrooms: Known for their meaty texture, they are popular on gourmet or vegetarian pizzas.
-
Shiitake Mushrooms: Often used for a "gourmet" option, bringing a smoky, buttery flavor.
Key Considerations
-
Fresh vs Canned: Fresh mushrooms are generally preferred, though they can release water during cooking. Canned mushrooms remain moist and are often used by chain restaurants to control moisture.
-
Preparation: Sautéing mushrooms before adding them to the pizza is widely recommended to boost flavor and remove excess moisture.
-
Other Types: In more specialized or European-style pizzas, you may find porcini (Karl Johan), chanterelles, or oyster mushrooms.
Pepperoni
Pepperoni is the most common and popular topping in both America and in Denmark.
The Italians get confused because the word peperone means bell pepper.
Salami can also be used instead but tastes too intense. Chorizo is not so strong in flavor.
The most common toppings that complement pepperoni pizza are Italian sausage, mushrooms, onions, and bell peppers.
Because pepperoni is salty, spicy, and oily, it pairs best with ingredients that add earthy depth, sweet contrast, or fresh crunch.
Popular Meat Toppings
-
Italian Sausage: Adds a rich, fennel-infused, and hearty flavor that matches the spice of pepperoni.
-
Bacon: Brings a smoky, crispy, and savory element to an all-meat slice.
Popular Vegetable Toppings
-
Mushrooms: Provide an earthy umami flavor that balances the strong spice of the meat.
-
Onions: Offer a sweet and slightly tangy contrast when they caramelize and soften in the oven.
-
Bell Peppers: Deliver a fresh, mild crunch and bright color to cut through the heavy richness.
Flavor Enhancers & Heat
-
Extra Cheese: Layers of mozzarella, parmesan, or dollops of creamy ricotta add a gooey, mild base.
-
Jalapeños or Hot Honey: Add a sharp kick of extra heat or a sweet-and-spicy finish.
Kebab
Kebab pizza is a Swedish style and combines Italian and Turkish cuisine.
The precise topping may vary, commonly onions and red bell pepper are used.
Also, champignons, corn and bacon are a possibility.
Marinating the kebab and letting the marinade soak in the fridge, recipe on kangaroo steak.
Defrosted and left for reaching room temperature,
those bacteria will start to cultivate, for 8-24 hours, that's there the taste starts to kick in.
If you want to add kebab dressing, then do so after baking or it loses its flavor due to the heat.
Minced Beef
Minced beef lightly seared just until the meat separates in a pan with salt & tomato puree before filling.
Total weight per spring form of 500g is huge for only one person.
Canned Corn
2-4 tbsp. canned corn. Avoid too much or it might get soggy. Balance the flavor by the buddy system.
Jalapeño
Go easy on the Jalapeños so it doesn't overtone the flavor nuances from the other ingredients.
For jalapeño popper see the Viking pizza section.
Jalapeño is my favorite source for vitamin C.
(118,6 mg pr. 100 grams.)
The recommended daily intake of vitamin C is 75 mg for women and 90 mg for men.
Red Bell Pepper
Red bell pepper, preserved in glass adds that acidic balance to fat that chefs commonly think of as a buddy system.
🥦 Broccoli 🥦
With broccoli, I recommended to steam cook it first, otherwise it will taste quite rancid and doesn't get quite tender.
🧅 Onions 🧅
Onion rings not finely chopped. Try coarsely chopped next time, onions taste like nothing. Whole onion rings in whole slices taste good, but the whole kitchen will smell of onions in the oven.
Homemade spice oil
(2 portions)
The oil draws out more flavor after 2-3 days, shelf life approx. 1 month.
½ Garlic (approx. 4 garlic cloves)
½ bunch of parsley (must be eaten the same day and must not be frozen/reheated. Poisonous!)
Thyme
5 tbsp. olive oil
Some apply olive oil in a spray bottle on top of the toppings at the end.
Herbs
Basil, oregano, rosemary but also thyme, sage and even parsley.
I recommend pouring the dried herbs into the palm of your hand and use the other hand to sprinkle the herbs evenly, so every bite tastes the same and not suddenly overtone the balance of flavors in one bite.
🧀 Cheese🧀
The Top Adhesive after Baking before Serving
Mozzarella
-Mozzarella is an elastic and springy cheese!
Depending on the exact size you are looking at, fresh mozzarella sold in round, snowball-like shapes go by a few different names
-
Bocconcini: These are bite-sized, snowball-like mozzarella balls usually about the size of an egg or a golf ball. The name literally translates to "little bites" in Italian.
-
Ovolini: Slightly larger than bocconcini, these are roughly the size of an extra-large chicken egg and perfectly resemble a small, smooth snowball.
-
Ciliegine: These are smaller, cherry-sized mozzarella balls.
-
Perline (or Pearls): The smallest round size available, resembling tiny pearls or miniature snowballs.
-
Burrata: While technically a distinct cousin to standard mozzarella, this cheese is served as a large, plump snowball-shaped pouch. When you slice it open, a rich, decadent center of shredded mozzarella curd and fresh cream (stracciatella) oozes out.
-
Palla di Neve: In Italy, some artisanal dairies literally sell large, high-moisture fresh mozzarella under this name, which translates directly to "Snowball".
A standard 12-inch pizza typically uses about 6-8 ounces (170-225 grams) of shredded mozzarella cheese.
Cheese Amounts by Style
-
Neapolitan / Margherita: Use 2.8 to 3.5 ounces (80-100 grams) of fresh mozzarella, as it has a higher water content and less is needed to avoid a soggy crust.
-
Standard / Medium Crust: Use 6-8 ounces (170-225 grams) of low-moisture shredded mozzarella for a balanced, classic layer.
-
Extra Cheese: Use 8-10 ounces (225-285 grams) if you prefer a heavy, extra-gooey cheese coverage.
Mozzarella slices for a pizza should be cut thin, around 1/4 inch (about 6 mm) thick, especially when using fresh mozzarella.
I recommend using a freshly sharpened thin-blade ham-slicer knife, not a chef's knife for this task.
Why Slice it Thin
-
Less Water: Fresh mozzarella holds a lot of water. Thick slices release too much liquid and make your pizza soggy.
-
Even Melting: Thin pieces melt fast and evenly without turning rubbery.
Tips for the Best Results
-
Dry the Cheese: After slicing, lay the pieces on paper towels. Pat them dry and let them sit for 15 to 20 minutes to soak up extra moisture.
-
Use Chunks Instead for Thick Crusts: If you are making a deep-dish or pan pizza where you want rich pockets of cheese, use small cubes or dice the mozzarella instead of flat slices.
-
Mozzarella di latte di bufala is made from unpasteurized buffalo milk.
-
Mozzarella di bufala campana is made from water buffalo milk from the Italian province of Campania.
-
Mozzarella fior di latte is made from fresh pasteurized or unpasteurized cow's milk.
-
Mozzarella made from milk blends.
For a pizza Margherita, Mozzarella fior di latte is used.
How to make homemade Mozzarella
How to make homemade mozzarella with two simple ingredients.
Mozzarella is a classic that goes well with everything from pizza to salads, and now you can make it yourself at home – with just two ingredients! It doesn’t require any fancy equipment, and you probably already have what you need in your kitchen. Here’s the recipe that will guide you through the process step by step.
What you’ll need
1.5 litres of whole milk (about 15 dl)
75 ml of white vinegar (about ¾ dl)
A large saucepan
A cloth or strainer to drain the whey
A pinch of salt (optional)
Rubber gloves for stretching
1. Heat the milk
Pour 1.5 litres of whole milk into a large saucepan and heat it over medium heat. Make sure the milk doesn’t boil – it just needs to reach a temperature of around 40-45°C/104-113°F. This temperature is important to prepare the milk to separate when the vinegar is added.
2. Adding the vinegar
Once the milk is heated, slowly add 75ml of white vinegar while stirring gently. Within a few seconds you will see the milk separate and form small white lumps – the curd. Remove the pan from the heat and leave for 10-15 minutes to allow the curd to set properly.
3. Separate the whey from the curd
Place a clean cloth over a sieve and carefully pour the curd through to remove the whey (the clear liquid). Press the curd gently to get as much liquid out as possible. Save the whey for other recipes if you wish.
4. Heating and stretching
Cut the curd into smaller pieces and heat them in the microwave for 30 sec. at a time until they are warm and soft. If you don’t have a microwave, you can use a bain-marie.
Once the curd is warm, you can start stretching it. Use gloves as the mixture may be very hot. Sprinkle with a little salt to add flavor. Stretch and fold the cheese until it is smooth, elastic and shiny. If it becomes too cold and difficult to work with, you can reheat it.
5. Shaping and Refrigerating
Once the cheese is elastic and malleable, you can shape it into a ball or the shape you prefer. Then place it in a bowl of ice water to cool it down and hold its shape.
Ready to serve
Your homemade mozzarella is now ready! Slice it and use it in a Caprese salad, on a freshly baked pizza or in a sandwich. If you have leftovers, the cheese can be stored in the refrigerator in an airtight container for up to a week.
Gorgonzola
A blue cheese named after the Italian city Gorgonzola near Milano.
For more information on blue cheese see the burger section.
Ricotta
Ricotta is not a cottage cheese, but they are related. Ricotta, unlike Mascarpone, is based on whey.
Ricotta is another Italian cheese typically used in a Calzone together with mozzarella and with pecorino on top on tomato sauce.
Ricotta can be made from sheep, goat, buffalo and cow's milk. Due to its low-fat content and high protein content, ricotta is a tasty and nutritious source of protein for a healthy and varied diet.
Mascarpone
Mascarpone is a mild, creamy fresh cheese made from sour cream and cream, which is coagulated with, for example, citric acid and possibly buttermilk. After coagulation, the whey is removed without pressing or aging.
Mascarpone can be used for a risotto or for a vegetarian pizza with sliced potato, mascarpone and rosemary.
Mascarpone is almost twice as expensive as Ricotta. Some would say you could use Ricotta instead of Mascarpone for a potato pizza, but in my opinion, it goes from a total success to a totale failure in a creamy texture and taste.
Stracciatella di Burrata
An Italian cow's milk (occasionally buffalo milk) cheese made from mozzarella and cream.
Burratina
Burratina is a smaller version of the Italian fresh cheese burrata, made from cow's (or sometimes buffalo) milk. It has an outer shell of mozzarella and a soft, creamy inner filling of stracciatella, which is a mixture of grated mozzarella and cream. Burratina is known for its rich, buttery flavor and creamy texture.
Stracciatella di Bufala
A cheese produced from Italian buffalo milk in the province of Foggia, located in the Apulia region of Italy, using a stretching (pasta filata) and a shredding technique.
Danish Cheese
Danbo
(Klovborg, Riberhus)
Klovborg medium-aged cheese is perhaps not quite the right choice, but better than Riberhus, even if medium-aged cheese is not obvious.
Do not thin-slice the Danbo cheeses. Chop it into chunks of about 1cm thick.
Karoline's
Karoline's Kitchen Pizza Topping Cheese or Mozzarella are both grated but tastes of nothing.
Pizza topping cheese is said to contain the worst oil of them all, palm oil.
The cheese is applied on top of the pizza sauce and not at the end, so that all the other toppings are not visible.
Grated cheese and ham in strips have a greater overall surface area.
Therefore, they lose their taste faster.
Havarti
Creamy Havarti cheese is originally from Denmark and is one of the most luscious melt-in-your-mouth cheeses to add to a pizza. Havarti is made with whole cow's milk and has 45% butterfat content. Creamy Havarti, another version of this Danish cheese, has 60% butterfat making them both perfect for melting onto a piping hot pizza pie.
On its own, Havarti has a sweet, mild flavor that's rich and buttery with a tangy undertone. Apart from traditional Havarti, you can find many variations made with herbs and spices. Whether you select a standard version or something like dill, garlic, or jalapeno Havarti, they all make an excellent addition to pizza. If you like your pizza with extra bite, try a horseradish Havarti with smoky sausage and earthy mushrooms.
For more cheeses see the burger section.
Cheeses to Avoid for Pizza
Brie – greasy fiasco
Brie is delicious on a cheese board, but in the oven, it becomes a disaster. It doesn’t melt – it disappears. Once oily lava that drowns out both the base and the topping. It’s far too sticky. Still want a bit of a brie vibe? Then throw it on after baking in small blobs.
Triple-cream – fat bomb in disguise
Brillat-Savarin and Saint André are fantastic… for crostini. But on pizza? Not so much. 75% fat content causes it to evaporate into oil. Someone suggests brick cheese instead – it melts beautifully and tastes mild. Triple-cream belongs as a topping, not a base.
Goat cheese – too intense and too unstable
Goat cheese tastes through, and that’s not always a good thing. It doesn’t melt; it explodes. And that’s not even figuratively – it turns into little blobs of oil and sour notes that overtones the taste.
Aged parmesan – more garnish than base
A classic for pasta, but on pizza, parmesan is too dry and too hard. It doesn’t melt but burns. Grated on top after baking? Perfect. As a base? No thanks. Someone recommends using it as a salty boost – not as a melting foundation.
Pecorino Romano – salt shock
Pecorino is strong, dry and stubborn. It refuses to melt and instead turns into little salty bits that don’t belong on a soft, crispy pizza top. It can work wonders as a finish, but if you build the pizza on it, the balance of flavors is already upset.
Parmesan Cheese
See the Spaghetti Bolognese section.
Asiago – only in small doses
Asiago is a bit of a salt bomb, especially when it’s aged. It also doesn’t melt very well, and it quickly becomes grainy. Young versions (Asiago Pressato) can be mixed with mozzarella but never use it alone. It's a little too intense.
Blue Cheese – too funky for pizza
Strong, salty and funky, blue cheese should be used with caution. It doesn’t melt evenly and often ends up in little oil islands. Some suggests Scamorza instead if you want a little more character without going too wild.
Aged cheddar – the cheese that drowns the bottom
Everyone loves cheddar – just not as a base for pizza. When it’s baked, the fat spills out and drowns the dough. It melts unevenly, becomes sticky and can overpower the rest. A little cheddar mixed with mozzarella. Perfect. On its own? Not unless you want a pizza pool.
Feta – crisp as chalk, slushy as seawater
Feta doesn’t melt; it crumbles. And when it finally does, it ends up either dry or too wet. The high salt concentration makes it unsuitable as a main cheese – use it after baking or on a salad. Not as the base for your margherita.
Gruyère – too fat, too stiff, too much
Gruyère is delicious in fondue and French onion soup, but pizza? No. It melts unevenly, gets greasy, and can overpower even the strongest tomato sauce. A small amount on white pizza is fine but forget it as a main cheese. There are better options.
Halloumi – elastic on the crust
Halloumi is the grilling champion of cheeses, but it doesn’t melt. It holds its shape and becomes rubbery. If you want a little texture, it can be used after baking in small pieces, but it’s not a cheese you want to see in a cheese pull.
Cheese Pull
Cheese with a high fat percentage is recommended for pizzas.
Sheep's milk has double the amount of fat as cow's or goat's milk.
That might be interesting if you try to get a gooey cheese pull.
The gooey effect is sometimes also called an ooey-gooey texture.
Some mix 3-4 different kind of cheese, for a good cheese pull.
For more information on cheese see the burger section.
Ingredient Ratios
Calculations & Proportions
Proportions
Weight Percentage (Grams)
-
50% Pizza dough (350 g)
-
20% Tomato sauce (4 to 10 tbsp.)
-
10% Meat and other toppings, total 75 g (surprisingly little)
-
20% Mozzarella cheese 125 g (drained weight)
Total weight 100% max. 700 g
In a standard 12-inch pizza (such as a classic Margherita or NY-style), the total weight typically ranges between 450 and 550 grams.
When looking at the total weight percentage breakdown of the individual components that make up a standard 12-inch pizza, the classic distribution follows this layout:
Component Weight Percentage Breakdown
-
Pizza Dough (50% – 55% of total weight): A standard 12-inch pizza ball usually weighs between 250 g and 280 g. It constitutes more than half of the pizza’s total mass.
-
Cheese (20% – 25% of total weight): A balanced 12-inch pie uses about 100 g to 120 g of shredded or fresh mozzarella.
-
Pizza Sauce (15% – 20% of total weight): Pizzerias typically ladle about 4 to 10 tablespoons of tomato sauce for a standard 12-inch pizza.) of tomato sauce onto a 12-inch base.
-
Toppings/Garnish (5% – 10% of total weight): Standard -baseline- items (like pepperoni slices, basil or oregano, and a drizzle of olive oil) make up the remaining 30 g to 50 g of the total weight.
-
Pepperoni sold as 100 g is about 2 x 50 g enough for two pizzas (2 x 15 slices)
Pizza chefs recommend using no more than two or three toppings to avoid overloading the pizza and making it impossible to eat with your hands - otherwise, use a knife and fork.
Sauce Measurement Guidelines
-
Light / Neapolitan style: 4 to 6 tablespoons (creates a thin, light layer).
-
Standard / American style: 6 to 8 tablespoons (gives good coverage without making the crust soggy).
-
Thick / Deep-dish style: 8 to 10+ tablespoons (if you prefer a heavier sauce flavor).
Tips for Applying Sauce
-
Pour the sauce into the center of the stretched dough.
-
Use the back of a ladle or large spoon in a circular motion to spread it outward.
-
Leave a small clean border around the edge for the crust.
The Pepperoni 12-inch Clockwork
Place one slice of pepperoni in the outer rim for every "hour", 12 pcs. total.
And fill up the gap in center with up to about 8 slices, 20 pcs. total.
Kebab
You need about 150 to 200 grams (5 to 7 ounces) of kebab meat for a standard 12-inch pizza.
Kebab Pizza Portions
-
Light / Standard topping: 100 to 150 grams gives a balanced meat-to-cheese ratio without weighing down the crust.
-
Loaded / Pizzeria style: 200 grams (or up to 300 grams if you are making a heavily piled street-food style kebab pizza).
Suggested 12-Inch Kebab Pizza Ratios
-
Dough: 1 standard dough ball (~250 g)
-
Tomato Sauce: 3 to 4 tablespoons (~60–80 g)
-
Mozzarella: 100 to 150 g (grated)
-
Kebab Meat: 150 to 200 g
-
Extras (optional): Fresh iceberg lettuce, sliced onions, and garlic/kebab sauce added after baking.
Ham
You need about 45 to 115 grams (1.5 to 4 ounces) of ham meat for a standard 12-inch pizza.
The amount of kebab on a pizza is typically significantly higher than the amount of ham due to the structure, density, and way it is cooked. When you order a pizza with kebabs, you often experience mountains of meat, while ham is distributed in a thinner, more spread layer.
Here are the main reasons for the difference
-
Volume and airiness: Kebabs are cut into thin, uneven strips that curl up when cooked. It creates a lot of air and volume, which makes the pile look huge. Ham, on the other hand, is cut into flat strips or cubes, which lay flat and compactly on the cheese.
-
Water content and shrinkage: Pizza ham (often molded ham) has a relatively high water content. When the pizza is baked, the water evaporates and the ham shrinks significantly. Kebabs (especially beef or chicken kebabs) are already fried and have lost most of their liquid, so they retain their size in the pizza oven.
-
Cultural traditions and expectations: In the Danish pizza scene, the kebab pizza (often "kebab, salad and dressing") has become an extremely popular luxury pizza, where customers expect a heavy, filling meal. Ham pizzas (such as a classic Vesuvio or Capricciosa) belong to the more traditional, Italian-inspired pizzas, where the balance between dough, sauce and filling must be more even.
-
Price and raw material quality: Although good kebabs also cost money, pizzerias often buy both in large quantities. The difference in quantity is rarely about the price of the raw material alone, but rather about the fact that a kebab pizza "must" sail in meat to satisfy the customer's expectations, while too much ham makes the pizza salty and soggy due to the liquid.
Ham Portions by Style
-
Light topping: 1.5 to 2 ounces
-
Standard/Moderate topping: 2 to 3 ounces (diced or 4-5 deli slices chopped)
-
Heavy/Meat-lovers topping: 4 ounces or more
Mozzarella
125g (drained weight) Mozzarella cut into 6mm slices, not too close to the edges.
Jalapeño
A 12-inch pizza typically uses 16 to 24 slices of jalapeños (about half to one full medium-sized jalapeño pepper), depending on how spicy you want it.
Recommended Amounts
-
Mild spice: 12 to 16 slices (roughly 2 slices per standard slice if cut into 8 pieces).
-
Medium spice: 16 to 24 slices (about 2 to 3 slices per piece).
-
Extra spicy: 25 to 30+ slices (or about 1 full chopped/sliced pepper distributed across the pie).
Tips for Topping Your Pizza
-
Fresh vs Pickled: Fresh jalapeño slices shrink slightly and pack a crisp heat, while pickled slices add a tangy bite. Both use a similar count by slice.
-
Distribution: Aim for 2 to 3 evenly spaced jalapeño rings per slice of pizza so every bite has a balanced kick.
-
Seed control: Leave the seeds in for maximum heat or scrape them out before slicing the pepper if you prefer a milder flavor.
Onions
You need about 1/2 to 3/4 cup of sliced or diced onions (or about 1/2 medium onion) for a standard 12-inch pizza.
Onion Amounts by Style
-
Standard topping (diced/sliced): 1/2 medium onion (roughly 1/2 to 3/4 cup) gives a balanced flavor without making the crust soggy.
-
Caramelized onions: About 1/2 cup of cooked onions, as they shrink down significantly during cooking.
-
Onion-heavy/French onion style: 1 whole medium to large onion if onion is the star ingredient of the pizza.
Tips for Best Results
-
Slice thin: Thin slices cook evenly and release less water.
-
Don't overload: Too many raw onions add excess moisture and can prevent the cheese from melting properly.
Red Bell Pepper
Use one-half to one medium red bell pepper for a standard 12-inch pizza.
Recommended Amount
-
Light to Moderate Topping: Use 1/2 of a medium pepper (about 1/2 cup sliced). This adds great flavor and color without making the crust soggy.
-
Heavy Topping: Use 1 whole medium pepper if you love lots of vegetables and plan to pre-cook or sweat them down slightly so they do not release too much water while baking.
Quick Prep Tips
-
Slice thinly: Cut the pepper into thin strips or small dice so it cooks evenly in the short time the pizza is in the oven.
-
Watch the moisture: Raw bell peppers release water as they bake. Pat the slices dry with a paper towel before putting them on the cheese or sauté them for a few minutes beforehand if you want a crisper crust.
-Yes, red bell peppers typically go on top of the mozzarella cheese on a pizza!
Putting the peppers on top allows them to roast, blister, and sweeten in the heat of the oven while losing excess moisture. However, you can also place them under the cheese if you are using thinly sliced raw peppers that might slide off or if you prefer them to stay softer and steam under a blanket of melted cheese.
How to Layer Your Pizza
-
Sauce first: Spread an even layer of tomato pizza sauce over your stretched dough.
-
Cheese second: Add your shredded or torn mozzarella next so it melts directly against the sauce.
-
Veggies on top: Arrange your sliced or diced red bell peppers over the mozzarella.
Pizza Baking
Different Methods
Important

⚠️ Max. 220°C/428°F
for parchment baking paper
Never re-use it ⚠️
Replace with a fresh sheet.

The advantage of using parchment baking paper is a more effortless cleaning of a baking tray after use.

16 x 10-inch premade square pizza dough
cut into 2 x 8-inch with a springform pan using
a pizza cutter. 8-inch suits 125 g
of fresh mozzarella.
Another brand of premade family pizza dough
only measures 14 x 10-inch, not enough for 2 x 8-inch.
Note: A premade pizza base comes rolled up on parchment baking paper.
Do not use springforms for temperatures above 220°C/428°F or it will warp and wobble, making impossible to close tight.⚠️
Chefs recommend max. Temp.
If you want to experiment with high temp. of +300°C/572°F, then remember to clean the oven, especially the bottom,
before use and open all windows. It gets pretty smokey in the kitchen.
Chefs recommend preheating the metal tray or springform pan for a conventional oven.
Don't open the oven for a sneak peek while baking or the temp. will drop drastically.
When the cheese starts to sizzle, it's almost done.
After 8 min. you can smell that something isn't right. It's the pizza base that's getting burned.
Trust your instincts, not the recipe.
Baking Time
Only 6-7 min. baking time if the pepperoni is not fresh or it gets burned on the edges.
Take out the preferably cold rising dough from the fridge 15 min. before adding the toppings.
Pizza toppings like sun-dried tomatoes gets burned way before you can smell the pizza base getting burned.
Brush the baking tray with olive oil and don't use parchment baking paper!
Expect a couple of minutes extra baking time for a calzone than an ordinary pizza.
Preheat the conventional mini oven to max. Temp 300°C/572°F, for 20 min.
Bake for 7-9 min. depending on the toppings.
Typically, me being single, I have a lot of leftovers to top the pizza with to the limit, so the minimum baking time starts at 10 min.
80% of success/failure is the backing of the pizza base, in a conventional grill-oven.
Method#1 High Temp.
Preheat a conventional oven to max. temp. 300°C/572°F, for 20-25 min.
For a round 8"-inch spring form pan pizza, place it on a 13x9" metal tray and place it in the middle of the oven.
A spring form pan doesn't really close tight, so expect the olive oil to leak in the bottom.
Do not place the springform in the bottom directly onto the heat element, unless you have a pizza stone, or it will start to wobble and should be discarded.
Bake it for 8-10 min.
For thin crust pizzas with a minimum of toppings as low as 4 min. should do.
Method#2 Middle Temp.
For square pizzas in a metal tray recommended, doesn't fit in the bottom of a mini oven.
Top/bottom heat, not grill or hot air.
So, if placed in the middle of the oven, then preheat it to 220°C/428°F, and bake it for 13 min.
10 min. is not enough.
At 12 min. the pepperoni starts to sweat, and the cheese starts to sizzle, bubble and melt.
After 15 min. the dough becomes burned and should be discarded.
Hot vs Cold Pizza
Some say cold pizza tastes even better the next day.
My experience is that it goes for chef's pizza from around the corner.
For homemade pizzas I recommend reheating it though.
Since it was prebaked, only 3 min. will do, after reaching the preheating temp. of 300°C/572°F.
For deep pan pizzas it's probably better to turn the heat down to 220°C/428°F.
An awful amount of cheese like one pound compensates for the cheese vanishing into the heated oven.
I take the pizza out of the oven 3 min. before it's done and then add the cheese to melt for the last 3 min.
But chefs do not recommend opening the oven for inspection while baking.
Oregano/basil doesn't tolerate heat, without losing its taste. I add it after baking when ready for serving.
Toppings seems to retain their flavor, if baked at max. temp.
Gets cold quickly, so serve immediately, after the cheese had two minutes to cool down for a gooey cheese pull effect.
Should you stove it in the oven before preheating, then use your instincts.
Some also add tomatoes after baking, as the wet filling makes the pizza base chewy and difficult to finish baking.
For Chicago style the tomato passata is added on top of the fillings after baking.
Depending on whether the pizza base is pre-baked and how much filling is used.
For deep-frozen, pre-baked pizza base from the supermarket, the baking time is only 6-8 min.
Preheating a conventional oven for 20-22 min. should do.
Temperature
The grill function in a conventional oven uses a powerful heating element at the top of the oven.
The temp. of the grill can vary, but it's often set to between 400-500℃/752-932F.
When using the grill function, it is important to be aware that the food can get very hot and brown or burned quickly.
So, keep an eye on the pizza during cooking and adjust the time and temp. as necessary.
The grill element in the top of a conventional oven can only reach 400℃/752°F,
but when measuring the temp. in the middle of the oven, it's still only between 260-305°C/500-581°F.
It's recommended to place the pizza stone directly under the grill element.
For even better results chefs would recommend a hot-air convection oven combined with a grill element.
Some modern stoves also have a pizza function, but I can't tell if that is only for defrosting frozen pizzas better than a microwave oven can do?!